

To set Target ROAS in Google Ads, open your campaign settings, expand Bidding, select Target ROAS where available and enter the percentage you want Google to work towards.
Before saving, check that your campaign receives accurate conversion values and that your target fits its performance and your business’s margins.
This guide follows the campaign interface shown in my screenshots. If you’re still deciding whether to use this strategy, read what Target ROAS is and how it works first.
1. Check Your Conversion Tracking and Values
Target ROAS needs numerical conversion values. Counting purchases or enquiries without a meaningful value does not give Google the information it needs.
For an online shop, check that each purchase reports its order value and currency. Depending on your setup, this can come through a Google tag, Google Tag Manager or conversions imported from GA4.
A data layer can make an order value available to your tags, but the tracking still needs to send it correctly. Google describes the supported approaches in its conversion value setup guide.
For leads, you might report a fixed value for each conversion action or send different values as leads are qualified or become customers. Base those values on business data. If every enquiry gets an arbitrary £100 value, Google will optimise around that assumption.
Review the conversion goals used by the campaign and test your conversion tracking if anything looks wrong.
My preference is to have around 30 or more purchase conversions a month before relying heavily on Target ROAS. This is a practical preference, rather than a requirement for every campaign. Check Google’s campaign-specific eligibility requirements for your setup.
2. Review Your Current ROAS and Choose a Starting Target
Look at a representative period of campaign performance, allowing time for delayed conversions to arrive.
The Conv. value / cost metric expresses your return as a ratio. For example, 3.00 means £3 in tracked conversion value for each £1 spent, equivalent to 300% ROAS.
Use this alongside your margins to choose a target. Google recommends referring to historical performance when moving to Target ROAS, as explained in its value-based bidding transition guidance.
I prefer to start with a less demanding target and build up gradually where results support it. For some campaigns I would consider 100–200%, but only where the business can afford that return during testing. It is not a universal starting range.
If you’re tracking revenue, 100% ROAS only matches your ad spend with revenue. It does not cover product costs or other expenses. My Target ROAS explainer covers this distinction and choosing a realistic target in more detail.
3. Open the Campaign’s Edit Settings Control
Find the campaign you want to change. In the interface shown below, click the cog beside the campaign name to open Edit settings.
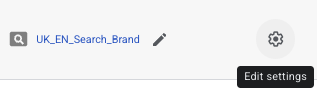
Check the campaign name before editing. Also check whether it uses a strategy shared with other campaigns, as changing a shared strategy can affect more than this campaign.
4. Expand Bidding and Select Target ROAS
Within the campaign settings, scroll to Bidding and expand the section. In my screenshot, the dropdown beneath What do you want to focus on? is set to Target ROAS.
Select that option where it is available, then enter your chosen percentage in the Target ROAS field.
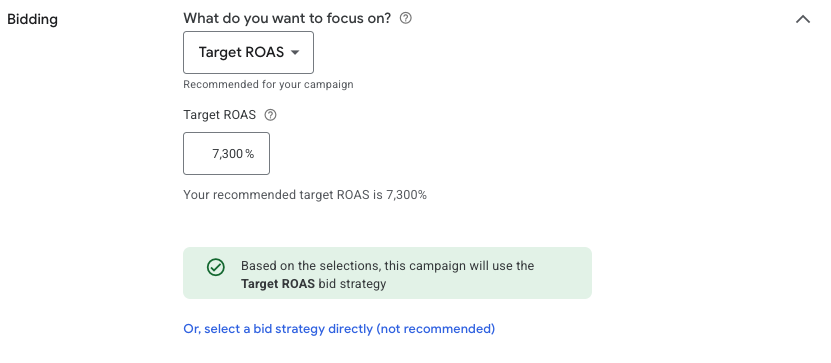
You may see Maximise conversion value with an optional Target ROAS setting instead. Google is updating its bidding labels, so wording can differ between accounts. The underlying bidding behaviour remains the same.
These screenshots show an existing Search campaign. Other campaign types and portfolio strategies can use different settings screens.
5. Review Google’s Recommendation and Save
Google may recommend a target, as it does in the screenshot. Treat that as a starting point to review against your performance and business requirements. You can choose your own target where appropriate.
A high recommendation does not mean another campaign can achieve the same return. Check the numbers for the campaign you are actually changing.
Save your changes, then reopen the bidding settings to confirm the strategy and target percentage.
6. Monitor Spend, Conversion Value and Actual ROAS
After saving, review actual ROAS alongside spend, conversion volume and total conversion value. A higher return on a much smaller amount of spend is not automatically the best result for your business.
For lead generation, check lead quality and completed sales as well. A return calculated from estimated enquiry values is only as useful as those estimates.
Allow for your conversion delay before judging the change. Google’s transition guidance notes that Smart Bidding can need one to two conversion cycles to adjust to a new target.
Record when you made the change. Google Ads Change History can help you check whether other edits happened at the same time.
How Do You Change an Existing Target ROAS?
Return to the campaign’s bidding settings, edit the percentage and save. Check the scope first if you use a shared portfolio strategy.
My preference is to make gradual changes and review their effect, rather than repeatedly raising the target in the hope that Google will produce a better return.
Why Is the Campaign Spending Less After the Change?
A target that is too demanding can restrict traffic. This can be particularly noticeable with niche products where there are fewer relevant searches available.
Check whether spending fell after your edit, whether tracking is still working and whether the campaign shows Limited by target. Demand and other campaign changes can affect spending too.
If the target is unrealistic for the campaign’s results, reconsider it. Raising the budget alone may not solve the problem.
Setting Target ROAS Successfully
Open your campaign settings, find Bidding, enter a realistic Target ROAS and save. The more important work is checking the values Google receives and making sure the target fits your business.
If you would like help checking your tracking and bidding settings, request a free Google Ads audit.